5 Super Fun Kids Activities

How many times have you been confronted with the situation where you need to magically create fun from thin air?
I have! Moreover, I'm sure every parent/ Grandparent/ Aunt/ Uncle has had to 'entertain' a child at some stage.
My 5 daughters are activity enthusiasts & they may well get this from me, so I have a success 'draw' in my head where I store tried and true activities that we have all enjoyed together.
These 5 fun activities can be adapted to vary in details or difficulty, depending on your audience and their likes and abilities.
I couldn't resist adding a few other fun bits and pieces too- I look forward to hearing your feedback and seeing your responses soon!
#1 To Bake with the kids, NOT to bake with the kids? - There is undoubtedly squillions of aspects of fun to be had whilst baking with kids. There is also, squil
Neither answer is WRONG or RIGHT, I just enjoy hearing other peoples perspectives- no judgement here!
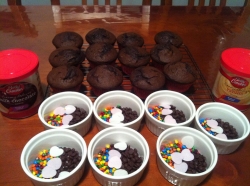
I enjoy doing a lot of different activities with my kids. There are times where I feel my tolerance isn't quite up to baking from scratch and a simple packet mix of muffins is suffice- purely because my kids are busting at the seams to land some icing and sprinkles (more than I thought was possible to fit on one muffin top) on those yummy 'babycakes' - so aptly named by my very enthusiastic 7 year old.
Then there are times when I want to teach my kids about baking- as I never was- the craft and accomplishment of creating food. These are normally a Saturday afternoon after chores are done and dinner is to finished.
Do you bake from scratch with your children OR do you use ready mixes?

This is a favourite in our house, my kids love it, my husband (and he doesn't NEED cake in his life like the kids and I do) AND it is great to use as so many of my daughters' friends and some of our regular visitors have gluten free diets.
This recipe came about by me attempting to make gluten free muffins from a recipe website;
Now, I can be pretty resourceful, BUT going on a 'quest' with Gandalf to Rivendell, Middle-Earth, Mordor and finally, exhausted- Mount Doom... That recipe and its unobtainable ingredients 'shalt not pass'... I mean, it's gluten free muffins for crying out loud, not some wild goose chase in 2000 B.C trying to locate a plant no one has seen for 'many moons'. sorry about that- recomposing now.
In light of the efforts and miles I'd travelled to gather said 'nuisances' I decided to do a little research on other ingredients I could use as alternatives that would actually be at my disposal.
Knowing the 'basics' for a really good muffin recipe, I set to work to build my own
*born is the Obtainable Chocolate Double Up Muffins
I do hope this is just as delicious for you!
Cook Time
Prep Time: 10-15 mins
Total Time: 30-35 mins
Serves: Makes 12 large muffins
Ingredients
- 6 Eggs
- 1 C Unrefined Sugar
- 1/2 C Almond Milk
- 1/2 C Desicated Coconut
- 3 Tbs Olive Oil
- 1/2 C Cocoa Powder
- 1 tsp Baking Soda
- 2 tsp Vanilla Extract
- 250 grams of 70% cocoa Dark Chocolate- Lindt is great
- 1/3 C Dark Chocolate Chips
Instructions
- Preheat oven to 170C degrees (fanforced).
- Line your muffin tray that holds 12 muffins (or 2 x holds 6 muffins trays) with muffin paper liners. Set aside.
- In my mixers' accompanying bowl, I place the eggs, sugar, vanilla, olive oil and almond milk and trun mixer to low, until all ingreatials are combined, about 1 minute.
- Then it's in with the cocoa powder, coconut, baking soda, chocolate chips and half of the amount of the chopped 70% chocolate.
- Mix on low again until all ingredients are combined
- Using a 1/3 cup measure, scoop the mixture to fill each muffin hole.
- Sprinkle the remaining chopped 70% Chocolate over the top of each of the muffins.
- Place in oven to bake for 20 mins, or until a 'poker' comes out clean
- Remove from oven and allow to stand for 5-10 minutes before removing from tray
- Transfer to wire cooling rack and allow to completely cool. (or not if you love a warm muffin)
- Ensure they are cooled completely before placing in ar tight container with lid to avoid them 'sweating'.
- Consume within 2 days
- Alternatively, this is a great muffin to wrap and freeze individually for school lunches etc.

#2 - DVDs
A quiet night in is a 'peace' of heaven at the end of a busy week
Whilst activities, creating new things, experimenting with nail polish and hair styles is always fun, there are times where throwing a mattress on the floor in the kids playroom and enjoying a good DVD together is the peace needed after a busy week of school, homework, housework etc is bliss - enter the giant bowl of popcorn!
SHOWING TONIGHT
I always let my girls chose what we're gong to be watching- my choices can bore the young- Bridget Jones' Diary, Pride & Prejudice and The Holiday- just to name a few- are beyond the 'rainbows, lollipops, Barbie Mariposa and Disney mindset they are more interested in.
I like the aspects of selecting choices between them, voting for one movie over the other and negotiations that follow to agree on a film.
I feel that these debates and persuasions are part of life's building blocks.
DVDs my girls love the most - There is an absolute plathora of kids movies in our home, we never are short of options for a great night in snuggling ;-)

![Dr. Seuss' The Lorax [DVD]](https://m.media-amazon.com/images/I/51A178KzxuL._SL160_.jpg)
![Wild [Blu-ray+DVD]](https://m.media-amazon.com/images/I/51Gx2M9ceLL._SL160_.jpg)

#3 - Nails!
A bit of nail colour, some dense glitter polishes and often extreme creativity coupled with bonding and warming giggle-fests is, to me, one of the greatest rewards there is as a mum. My girls make me so proud of the little ladies they are... I must be doing something right! Right?
Quick Nail Tip!
To assist with drying times- a small bowl of cold water (with ice cubes if possible) is a great way to assist the drying time of nail polish

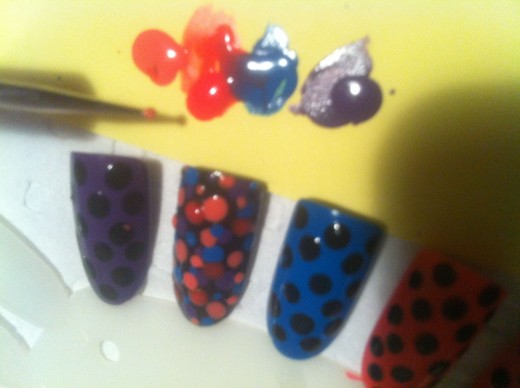
Dotty Nail Fun - Creativity that is only limited to your imagination, no need for 157 polish colours- my husband keeps telling me :-)
This is one of the nail art designs I have been able to photograph step by step so I could share it with you all.
The time, difficulty and cost are all varying, it may take you 20 minutes from start to finish, it may take far longer if you have never done anything like this before. The cost can be $0- if you already have a bunch of polish colors to work with.
Good luck, most of all, have fun!
Time required: 15-45 mins
Difficulty: medium
Cost: minimal
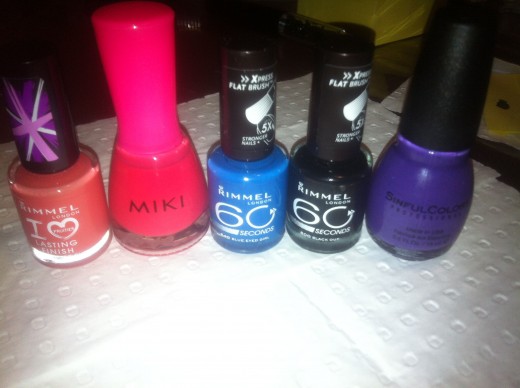
Materials:
- Nail polish colours- 5 different ones if possible
- I used; Black
- Blue
- pink
- orange
- purple
- top coat
- newspaper (covering your working area)
- any scrap paper for nail art dotting
Tools:
- Toothpicks for small dots
- Pins for larger dots (the ones with the little plastic bead on top)
- I do have nail dotting tools, but the above work just as fine :-)
Instructions:
1. Apply 1 colour to each nail- allow to dry
eg, thumb- blue
index finger- pink
middle finger- purple
ring finger- black
pinky finger- orange
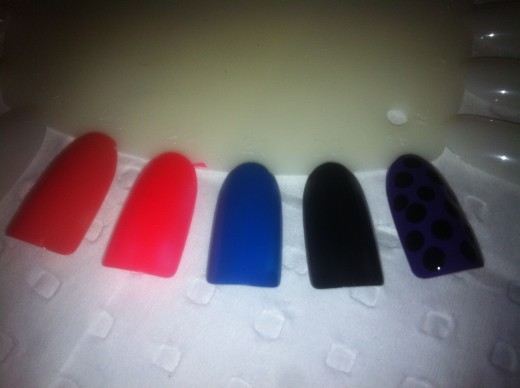
2. Do a 2nd coat of each colour- not the black nail, leave it with one coat- allow to dry
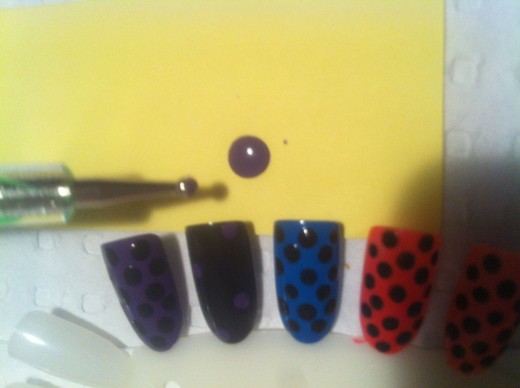
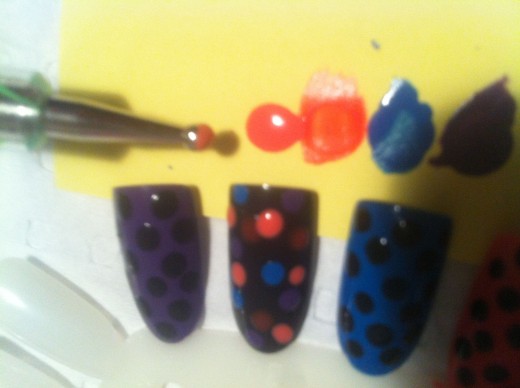
3. On the nail painted black, drop a blob of nail polish onto your scrap paper
using the toothpick, apply about 3 small dots randomly onto the black nail
then using the pin head apply 3 dots randomly- allow to dry
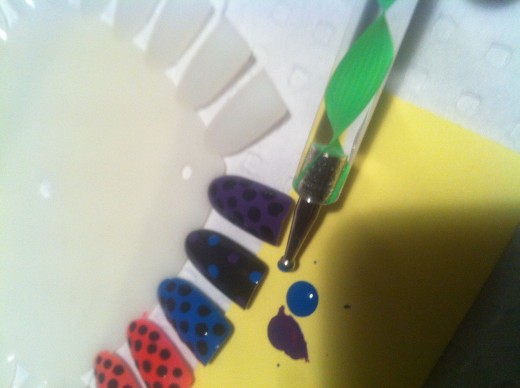
*there is often excess polish left on the paper, I remove the polish brush from the bottle, letting excess run into polish bottle and I swipe up the excess polish off the paper back into the polish bottle (waste not- want not right?)
4. Repeat step 3 on the black nail, using each of the other 3 colors not yet dotted
- allow to dry really well
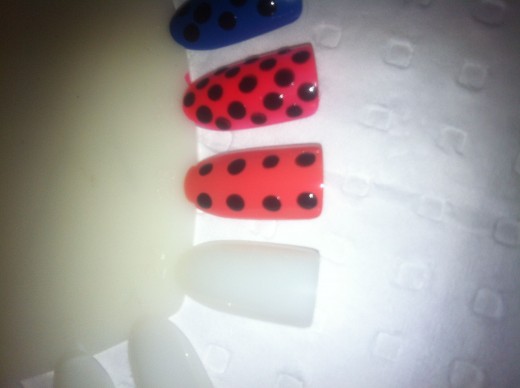
5. Blob out a big blob of the black polish onto the scrap paper and using the pin head, apply black dots over the first colored nail- allow to dry
6. Repeat Step 5 on the remaining other 3 nails of color not yet dotted
Allow to dry really well
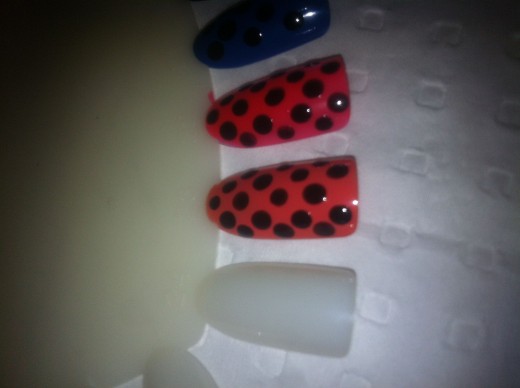
7. Drying time and NOT panicking!
*after about 2 minutes, you can check to see if your polish is dry by LIGHTLY tapping (not rubbing or wiping) the nail polish, if you se your finger print in the polish, it needs more time.
** ARGH! I have a finger print on my polished nail now = easily fixed...
I know, I said don't wipe or rub, BUT- to remove said fingerprint- VERY LIGHTLY run your finger over the polish to smooth t ever so gently. An alternative that is very effective- run your TONGUE (not a typo- use your tongue) to smooth the polish- generally, this is just for you to do on yourself AND you probably wont want to teach it to the kids :-)
8. Finally, apply a thin coat of top coat over the nail AND a line along the free edge of the nail- this will help to 'seal' the work you've done and avoid those pesky chips*depending how 'hard-core' you are with your hands- apply a little top coat every 5th day (if you only have minimal wear on hands and nails) or for extreme hand use and hard working ladies- every 2nd day- to the free edge to keep your creation in shape
9. Share! If you have had fun creating this or any other nail designs, please share them with me, I'd love to see <3
Nail Art accessories
The items I have listed here are inexpensive, useful bits and pieces for practising and completing nail art.
If you are uncertain or need guidance, I am here and very happy to help :-)
Item 1- Cuticle Pusher - A useful tool for removing excess skin - cuticle- that has grown along the nail bed with the nail growth. Removing this helps to prep your nail bed ready for polish.
Item 2- Nail File - used for removing uneven nail edges and shaping to your desired length. You will use this as part of the nail prep before painting.
Item 3 - piece nail art brush and dotting tool set is sure to equip you with all the tools you'll need to create most any design.
*the brushes each create a different stroke style, size and finish, so don't be afraid to dabble to your hearts content.
Item 4 - Display/ Practice Nail Wheel Board - I use these to create new designs, play with concepts and display my work.
*you can use acetone free nail polish remover on these without damaging them, allowing you to start fresh as often as you like
Item5 Cuticle Oil - This is an essential after a manicure, providing nourishment to the cuticle area.
*I love these ones especially because they come in a variety of gorgeous smelling scents to choose from.
Some fun activities with my girls at home - dressups, baking, dvds, dancing or nails, its all fun
Click thumbnail to view full-size
")


")


")


")


")


")


#4 - Experimenting with Hair
The following style is very quick to complete; to allow you to (sort of) see how quick- I did them this morning for the girls before school.
I am hoping the below How-To module helps you in having a go at something new.

Twisted back into Plait
School mornings are always a rush in our house, however, I'm extremely vigilant with my girls hair hoping to combat the dreaded head lice- There seems to a notification from the school at least once a month advising parents to check their children's hair.
As a result, in our 'Girly Fun' hair activity sessions, I have developed some quick easy hair styles for school that look lovely, and ensures their hair is kept tied in all day, helping avoid lice, plus, this helps keep hair cleaner for longer too.
Time required: 2-3 mns
Difficulty: easy
Cost: $0
Materials:
- 1 hair elastic
Tools:
- medium toothed comb
Instructions:
1. Comb the hair smooth into place and create a part on one side of the crown- pictured
2. Section a piece from the top and stand on the oppose of the part you've just createdHalf the section n your hand into 2 pieces - one at the front and one closer to the back of the head
3. Twist the front piece over the top of the back piece - toward the back of the head.
The 'back' piece should now be closer to the face.
using the comb, pick up a small piece of hair from the edge of the face and add to the 'back' piece.
Twist this over the top of the 'front' piece4. Repeat step 5 until you get to about the top of the ear, twist the 2 pieces around and around until there is only an inch of hair left to use.Ask your child to hold this piece out of the way whilst you comb the loose hair into a ponytail into your hands,
5. section all the loose hair into 2 pieces.Using the twist your child is holding for you, this will be the 3rd piece of the plait you are now going to do.
6. plait the 2 loose pieces of hair with the twisted piece from the front.
Secure with elastic when you finish
#5 DRESS UP TIME!
Oh the fun you can have,
dressing unlike the norm.
gather all that you can
and have a dress up storm!
:-)
Girly dress up fun
These are just a few of the dress ups we have in our toy room for the girls


Dress Up Fun for the Twins
We only generally buy something because it looks too darn cute not too, needless to say, there is never a shortage in our home.
However, we do not spend a fortune on these novelty items, we HUNT for bargains :-)
The following are some fantastic dress ups we've purchased


